How to Install Smart Blinds Without Wiring: Easy Step-by-Step DIY for Wireless, Battery‑Powered Shades
Introduction
Modern living spaces increasingly rely on automation to improve comfort, energy efficiency, and accessibility. Installing smart blinds without running electrical wires offers a low‑cost entry point to a smarter home while preserving wall integrity for renters or those who dislike permanent modifications. This guide will teach readers how to measure, mount, power, and integrate wireless, battery‑powered blinds using reliable Amazon products. By the end of the article, one will be able to complete a fully functional smart‑blind system in a single afternoon, enjoy programmable sunrise/sunset schedules, and benefit from voice‑controlled convenience.
What You’ll Need
- Measuring tape and a pencil for marking dimensions.
- Level or laser level to ensure horizontal alignment.
- Cleaning cloth and mild cleaner for window frames.
- Optional: small screwdriver for battery compartment access.
- One of the recommended wireless blind kits (first mention linked below).
Step‑by‑Step Instructions
1. Measure Your Window and Choose the Appropriate Blind
Accurate measurements prevent gaps that compromise blackout performance and aesthetic balance. Measure the width at the top, middle, and bottom of the opening, then record the smallest value. Height should be measured from the top of the frame to the desired lower edge of the shade. For most standard windows, a 34.5" × 72" size works well, matching the dimensions of the Hapadif Motorized Roller Blinds.
Why this product? It offers a no‑drill installation, a three‑layer blackout fabric, and a remote control for manual adjustments. Priced at $89.60 with a 4.3‑star rating from 499 reviews, it provides solid value for bedrooms or home offices where privacy and light control are paramount.
2. Prepare the Window Frame
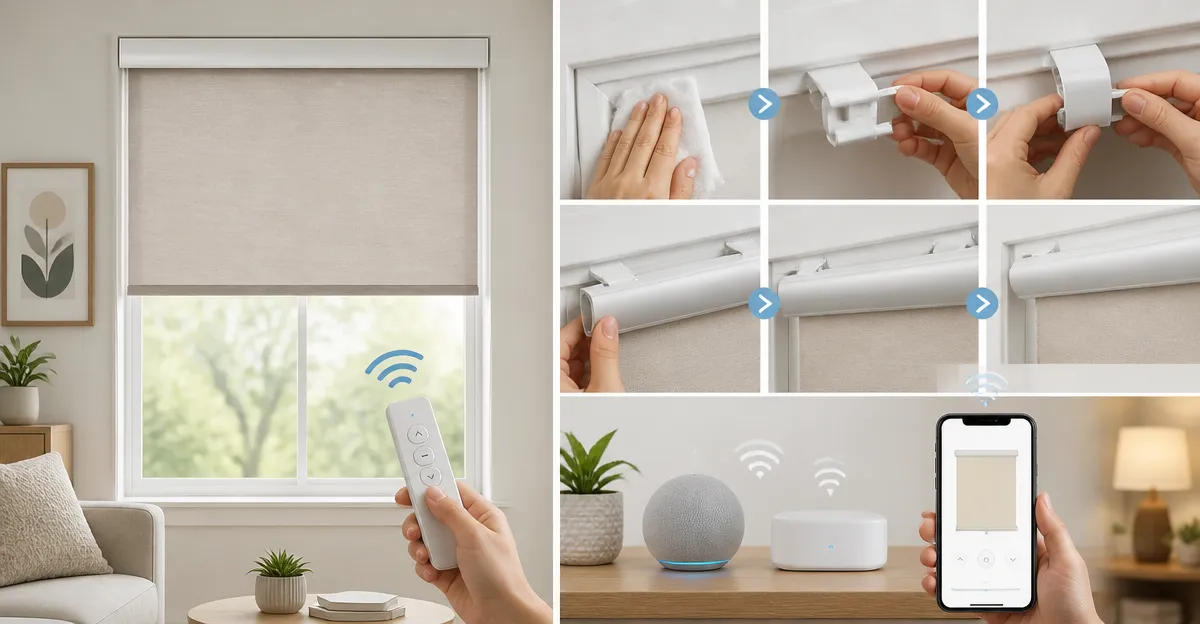
Clean the top rail where the adhesive extension block will sit. Remove dust and residue with a damp cloth, then allow the surface to dry completely. This step ensures the adhesive achieves a strong bond, preventing later slippage.
If you prefer retrofitting existing horizontal blinds rather than replacing them, consider the SwitchBot Smart Blinds Kit. The kit includes three Blind Tilt units and a Hub Mini, allowing you to convert existing louvers into smart blinds without any drilling. At $164.99 and a 4.4‑star rating from 798 reviews, the kit provides solar charging and precise 2° adjustments.
3. Install the No‑Drill Bracket or Blind‑Tilt Unit
For the Hapadif system, locate the adhesive extension block included in the package. Peel the protective film, align the block with the groove of the upper rail, and press firmly for 30 seconds. The block is designed for a single‑use application; avoid stacking multiple blocks as this reduces holding strength.
When using the SwitchBot Blind Tilt, clip the motor onto the tilt rod of your existing blind. The device fits pole diameters from 6.2 mm to 12 mm, making it compatible with most standard blinds. Secure the clip with the provided screw (a small Phillips screwdriver may be required). The motor’s built‑in 2000 mAh battery, supplemented by a solar panel, ensures continuous operation without external power.
4. Attach the Motorized Blind or Connect the Tilt Motor
If you selected the Hapadif roller shade, slide the fabric panel into the rail, ensuring the valance sits flush against the top. The valance blocks light leakage at the gap between fabric and rail, enhancing blackout performance.
For the SwitchBot system, use the app to calibrate the open and close positions. The calibration routine guides you through moving the blind to its fully open state, then to its fully closed state. This process stores the endpoints, enabling precise percentage‑based control later.
5. Power the Blind and Verify Battery Installation
Both Hapadif and SwitchBot solutions rely on AA batteries (Hapadif) or a rechargeable lithium pack (SwitchBot). Open the battery compartment located at the top of the blind, insert fresh AA batteries (included with Hapadif) or ensure the SwitchBot battery is fully charged via the solar panel. Battery life typically lasts 4–6 months under daily operation; the SwitchBot solar panel can extend this to virtually indefinite use when exposed to direct sunlight.
For a premium, custom‑fit experience, the KINCMO Motorized Blackout Blinds provide a 4‑layer fabric and Matter‑compatible connectivity. Priced at $115.99 with a flawless 5‑star rating from 767 reviews, these blinds are ideal for large windows or French doors where a seamless, quiet operation is desired.
6. Configure Smart Controls and Voice Integration
Download the manufacturer’s app (Hapadif uses the AX290 app, SwitchBot uses the SwitchBot app). Create an account, then add the blind via Bluetooth. Follow the on‑screen prompts to name the device and assign it to a room.
To enable voice control, link the app to your preferred smart‑home hub. Hapadif requires a compatible bridge; the AX290 motor works with Alexa and Google Assistant after hub setup. SwitchBot devices connect directly to Alexa, Google Home, or Siri when paired with the Hub Mini (included in the Smart Blinds Kit). Once linked, simple commands such as “Alexa, open the bedroom blinds” will trigger the scheduled action.
If you own a Matter‑enabled hub, the KINCMO blinds can be added without additional bridges, offering a truly plug‑and‑play experience. Their ultra‑quiet motor and remote control also allow manual operation when the network is unavailable.
7. Test, Fine‑Tune, and Set Schedules
Run a full open‑close cycle using the app or remote to confirm smooth motion. Adjust the top and bottom limits if the blind stops short of the desired position. Most apps provide a percentage slider for precise height control.
Create automation rules based on sunrise and sunset times. For example, schedule the blinds to open 15 minutes after sunrise to let natural light in, and close 30 minutes before sunset to preserve privacy. Both Hapadif and SwitchBot support timer‑based scenes, while KINCMO offers scene creation via the Matter ecosystem.
Tips & Pro Tips
- Battery Management: Keep spare AA batteries handy for Hapadif blinds. For SwitchBot, place the solar panel where it receives at least 4 hours of direct sunlight daily.
- Leveling: Use a level when attaching the adhesive block or clipping the Tilt motor. Even a slight tilt can cause uneven shading.
- Privacy Enhancements: Consider side light blockers (available as accessories for KINCMO) to eliminate edge light leakage.
- Group Control: SwitchBot allows grouping up to four blinds under one button. Use this feature for living‑room windows that should open simultaneously.
- Noise Reduction: If motor noise is noticeable, enable the “quiet mode” in the SwitchBot app to reduce speed during operation.
Troubleshooting
- Blind Won’t Open: Verify battery polarity and ensure the battery compartment is fully seated. Re‑pair the device via Bluetooth if the connection was lost.
- App Cannot Find Device: Move your phone within 5 feet of the blind and restart the app. For Matter devices, ensure your hub firmware is up‑to‑date.
- Solar Panel Not Charging: Check that the panel is not shaded and that the connector is securely attached. Clean the panel surface to remove dust.
- Edge Light Leakage: Install side blockers or adjust the blind height to fully cover the window frame.
Conclusion
Installing wireless, battery‑powered smart blinds is a straightforward process that delivers immediate comfort, energy savings, and accessibility. By measuring accurately, using a no‑drill mounting method, and selecting a reliable product such as Hapadif, SwitchBot, KINCMO, or MANSNIX, one can achieve a professional‑grade installation without any electrical work. The automation capabilities—timers, voice control, and group scenes—transform ordinary windows into intelligent light‑management systems. Readers are encouraged to follow the steps, experiment with scheduling, and enjoy the enhanced ambiance of a truly smart home.
Products Mentioned in This Guide
Frequently Asked Questions
Can I install smart blinds without any electrical wiring?
Yes, battery‑powered wireless kits let you mount and operate blinds without running any wires.
What tools are required for a DIY smart‑blind installation?
A measuring tape, pencil, level (or laser level), cleaning cloth, and optionally a small screwdriver for the battery compartment.
How do I ensure the blinds are level when mounting them?
Use a level or laser level to mark a straight line on the window frame before drilling or attaching the brackets.
Do battery‑powered smart blinds need frequent battery changes?
Most kits use long‑life rechargeable batteries that last several months, and many include a low‑battery alert.
Can I control battery‑powered smart blinds with voice assistants?
Yes, most wireless kits integrate with Alexa, Google Assistant, or Siri for voice‑controlled opening and closing.